ShapeMaster User Guide
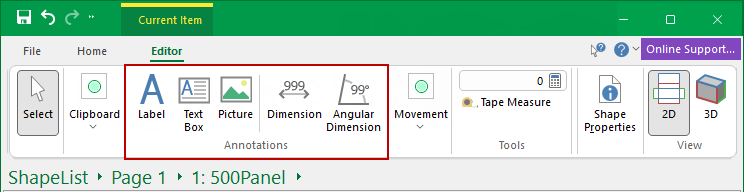
Annotations are drawing tools, allowing you to add a note, explanation, picture or dimensions to your drawing.
 Watch the Video to learn how to create and display dimensions and annotations to parts via the breadcrumb bar.
This command lets you place text into a job/drawing. You can select text size, font and so on, simply...
This command lets you insert text inside a rectangular box into a drawing. The text auto-wraps to fit inside the box, and if there is too much text, it is clipped to the box. To do this follow the instructions above for Label. To place a text box on a drawing, you need to specify two points which are opposing corners of the rectangle. Just select the text box tool, click on the drawing while holding the button down, then drag the mouse to form a rectangle. You can then move the text box and resize it exactly to your needs.
This command lets you insert a picture directly into a drawing. Bitmaps are picture files with an extension of "bmp". You can create, view, and edit these in 'Paint', which comes with a standard install of Windows. Almost every other image program will let you view bitmaps as well. The Bitmap tool can be used to place one of these images on a drawing, for example, you may place your company logo on a drawing template. As well as regular bitmaps, the tool also supports DIB (device independent bitmap) and compressed RLE (run length encoded) images.
Dimension tools are used for measuring different parts of your shape and the following associated dimensioning commands allow you to easily insert and place dimension lines.
See the following for detailed discussions:-
The Angular Dimension tool allows you to dimension...
Then after the first one or two clicks (depending on where you click) there is a rubberband movement of the arc dimension line until you click to place.
This is a drawing tool and the colour and style of the dimension lines can be changed and, if required, saved for future use - see Angular Dimension Property Sheet.
For detailed discussion see the topic on the Current Item Editor.

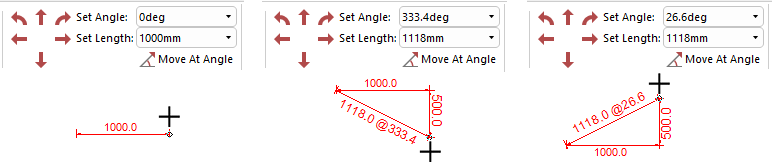
Allows you to draw a line between two points while displaying the horizontal offset, vertical offset and total distance between them.
First, select/turn on the Tape Measure and then...
When you release the mouse button, the distance between the two points and angle are copied into the Set Length and Set Angle edit boxes for convenience.
In ShapeMaster V12, you can create and display dimensions and annotations to parts via the breadcrumb bar.
After adding your shape to the list [press F12], you can select your part in the breadcrumb bar. You can then add horizontal, vertical and angular dimensions to your part, as well as text labels and text boxes. These details will be included in reports that display images, such as our ShapeList reports.