ShapeMaster User Guide
ShapeMaster and its associated products have the ability to import a wide variety data directly to the program, allowing you to...
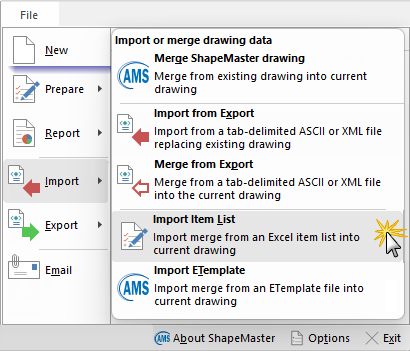
In this document we will outline how to generate an import file (Excel format) and then import this into ShapeMaster by selecting File > Import > Import Item List.
When importing, a dialog is displayed (very similar to the Open dialog) where you can select an existing drawing file to merge with the current one. It allows you to control what happens when answers in the current job/drawing conflict with those in the job/drawing being merged in.
In this tutorial we will use Excel to create a data file and save it as a tab delimited file format, with a '.tab' extension and then import into ShapeMaster.
To start with, there are two (2) different items to import.
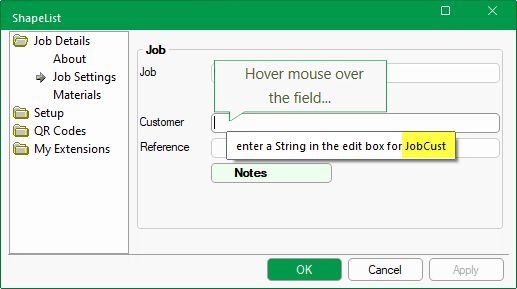
Global and Shape properties are imported differently from within the import file, so you need the following details... Hover mouse over the field...
When preparing to import a value, you first need to find its field name. In this example...
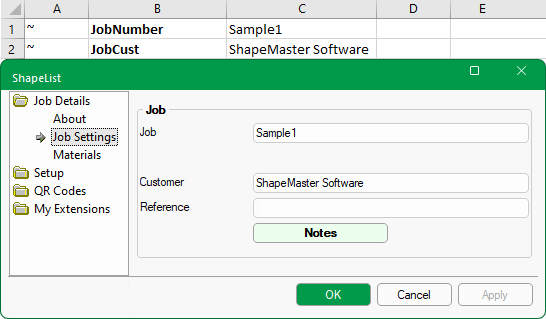
- Open the Drawing Properties[F4] and go to the Job Details > Job Settings page, as we want to import the global “Customer”.
- Then hover the mouse over the field and the variable name required will be displayed, in this case JobCust.
This can be done for as many Global values as required. The variable name will always follow the word ‘for’, as shown.
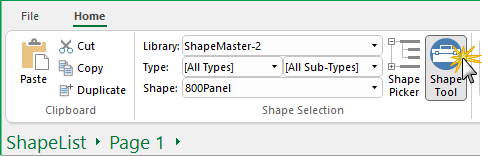
Now we will get the name of the shape we will import, for this example, 800Panel.
- To do this, we can find the Shape/Part name using the Home > Shape Selection drop list, as shown.
It is very important to get this name correct and the Shape / Part name must be in the currently loaded library when you import the list file into ShapeMaster, otherwise it won’t be found and will be ignored.Then we need are the values, such as Height or Width, that we would like to change on the required Shape/Part.
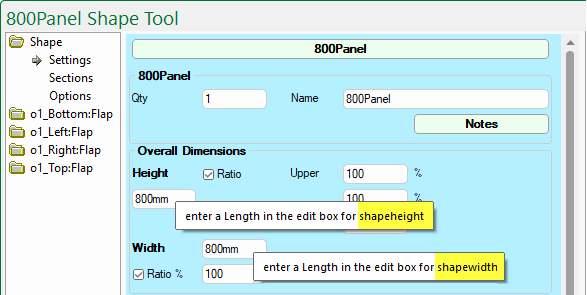
- Look at the Shape Properties (you can use the Shape Tool);
- Then hover the mouse over the required field and the variable name will be displayed, in this case ShapeHeight and ShapeWidth.
This process can be repeated for as many Shape / Part variables required. The variable name will always follow the word ‘for’, as shown.
Now that we know what we want to import, it is time to create the import file.
The file format is Tab delimited and can be created from a number of different programs, such as ERP or Design program, Text Editor, from a Website page or in Excel (as discussed in this tutorial).
Click here to download a simple Excel file that can be used in this tutorial. Note that ...
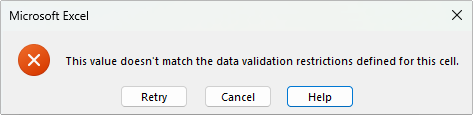
Data Validation Error Message - Trouble Shooting Excel
Issue: You may find that when you try to enter Shape/Part values, a 'data validation' error message pops up.
[If you get message 'Erase current settings' (click on image) - just click OK and continue with the fix.]
Click to view possible 'Erase current settings' message
For a detailed 'how to' on cell input restrictions/rules, click on the Help button (Microsoft website).
To Fix: To remove all validation...
- Select the cells to remove the rule from;
- Select Data > Data Validation;
- On the Settings tab, under Allow, select Any Value and click OK.
Global values get input first - see Extra Notes.
All global values require a ~ (Tilde) in front of them to show they are a “Global” value and they read left to right.
Column Headings
Column headings (in a row from left to right) provide the middleware variable that will be set by the value provided in that column.
- The first column must always be code as it selects the shape/part required from the library.
- Subsequent column headings will give the name of the middleware variable (e.g. CabWidth) that will be set by the value provided (e.g. 450mm).
Column Values
Shape/Part values are entered (in column from top down) under the applicable heading - see Extra Notes.
- Where data is not provided (e.g. CabHeight below) then no import into this variable takes place and remains as the library default.
- Then all the other variables...
Only the values you wish to change from default are required to be filled in. One shape/part may require a field changed and the next shape/part may not, so this field can be left blank, as shown in these examples.
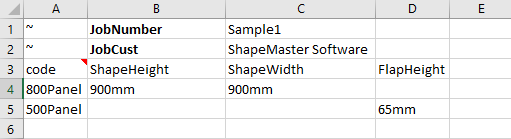
Sample of completed file
The completed file using the examples above, should look something like this...
Also, global values are not actually required for this import to work successfully, so if no global values are required for an import, the entire top section that starts with the ~ (Tilde) can be removed and the import files' first line should be the “header” line starting with “code”.
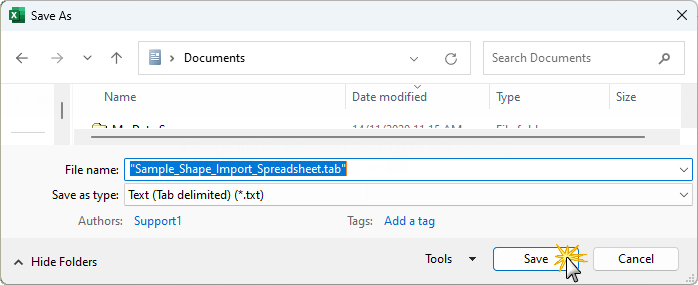
Now we have all our data in the Excel file, we need to save it as a tab file format, with a .tab extension. To do this...
Select Text (Tab delimited) from the Save as type drop list - note that the extension is (.txt)
As ShapeMaster will not import a .txt file, we need to change the file extension from '.txt' to '.tab' manually.
Note on Excel string/quotes
Excel will send strings out wrapped with extra quotes, for example a raw export of 13" gives "13"""
These quotes, however, are stripped and the file will read directly in during the Import/Merge Item Lists.
Now you can import this into ShapeMaster by ...
File > Import > Import Item List
Click to view sample tab file
The Format is also very compact and flexible. In its simplest form...
 for a string or 0 for a number.
Example
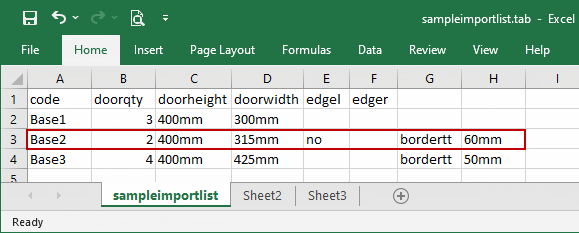
In the sample import file shown below, there are six (6) fixed columns (first column must always be code).
But if one of the items needs extra specifications (as shown for row 3), then you can add additional cells at the end of its row, putting middleware variable first then the value along the row.
- The pair of cells G3 and H3 sets the variable bordertt to 60mm (top border default is 50mm).
- Columns E and F which we set up in this example as edge flags, had to be skipped because these are fixed columns. Therefore, extra specifications had to added after these.
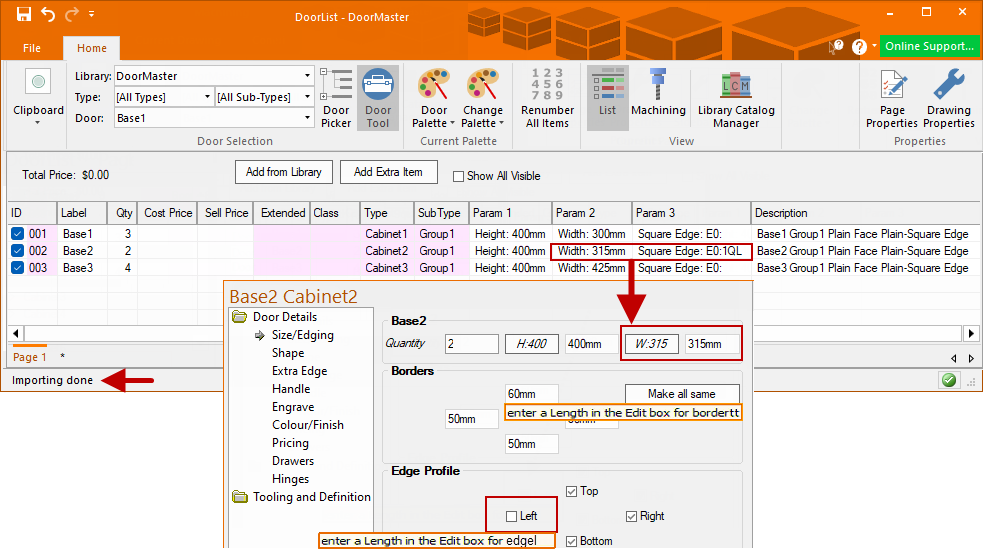
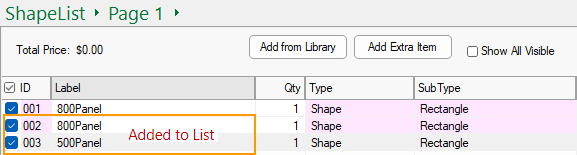
Result after importing this sample tab file into DoorMaster.
Hover over the edit boxes to see tool tip with variable name.
In this screen grab, we have selected the Base 2 door which came from row 3 of the sample file.
Quantity = 2, Width = 315mm, Left Edge = off (E3 has no for edgel) and Top Border = 60mm
The importing uses tab separated ASCII files.
Global rows i.e. Drawing Properties, require a ~ (Tilde) in the first column to show they are a “Global” value and they read left to right.
For example, these two (2) rows would import the three (3) properties AccountNumber, AccountName and AccountState.
Rules
The rules for item list imports is more relaxed than regular ASCII imports.
 for a string or 0 for a number.
Example
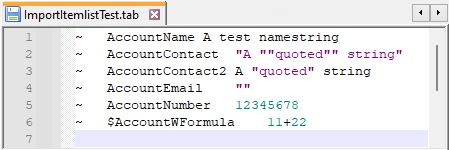
This is an example of importing a few global variables...
In the following import the results are...
- AccountContact and AccountContact2 give exactly the same resulting Value i.e. A “quoted” string
- AccountName has no quotes at all but still imports as a String.
- AccountNumber imports as a Whole Number because the value 12345678 provided in numeric.
- AccountEmail required a quote
- The last line $AccountWFormula has a $ in front of the variable name, so that 11+22 is interpreted as a formula.