ShapeMaster User Guide
This section will discuss each of the base shape formats and explain the options available.
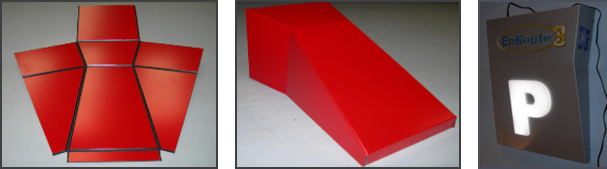
ShapeMaster gives you the ability to select a shape from a ready to use library of shapes. You can then type in a few parameters onto a friendly window to reformat the shape to your own specifications with a wide variety of options and the ability to save common used shapes in your own customised shape list. This allows you to easily create light boxes, shop front signs, cladding and a lot more. A typical example is a lightbox made from folded ACM such as Alucobond or DiBond.
Click to view options used to create the lightbox.
The geometric shapes created by ShapeMaster include information for (typically) two different tools in this case – a V cutter tool which cuts through the top surface to prepare all the folds. Then a through cutter which cuts out the overall shapes. Some edges have both tools used, to provide the angled edges needed to make a smooth mitre join when the material is folded. And sometimes different V cutters are needed when folding more than 90 degrees.
 Watch the Video on creating shapes in ShapeMaster.
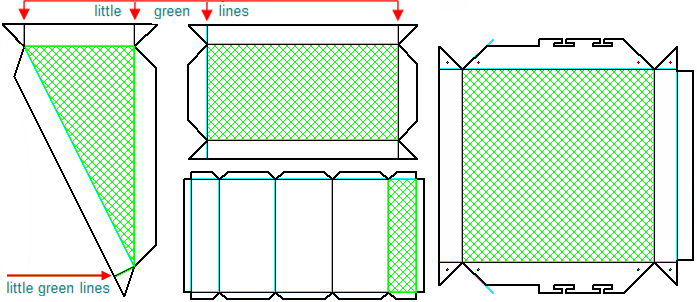
Here are some typical cladding shapes. Little green lines indicate that a third tool is used i.e. a 120 degree V cutter. This is because, if the flaps need to fold more tightly than 90 degrees, you will need to score the fold line with a 120 degree cutter. The tool is swapped in and out as the shape changes. This is done easily from ShapeMaster with, as in this case, user defined formulas controlling the tool selection.
ShapeMaster Software fully integrates with EzyNest with a feature called Machining View, shown below.
This allows you to generate CNC Code and Label information at the push of a button i.e. Generate Nests. CNC Config replaces the need for accessing the ATP in EzyNest as well as allowing you to set required Preferences and Driver Selection options. This allows you to do all this and see nested layouts without requiring to open another software package. It also eliminates downtime and any unforeseen machining issues.
The shapes can be cut individually or nested onto full sheets for efficient cutting, which can be done automatically using a flatbed router with appropriate tools. EzyNest allows you to add lettering and decorative cutouts to a lightbox directly. ShapeMaster creates the dxf’s and dxt to seamlessly integrate with EzyNest. When cutting out a batch with mixed sizes, advanced nesting optimizes your material usage.
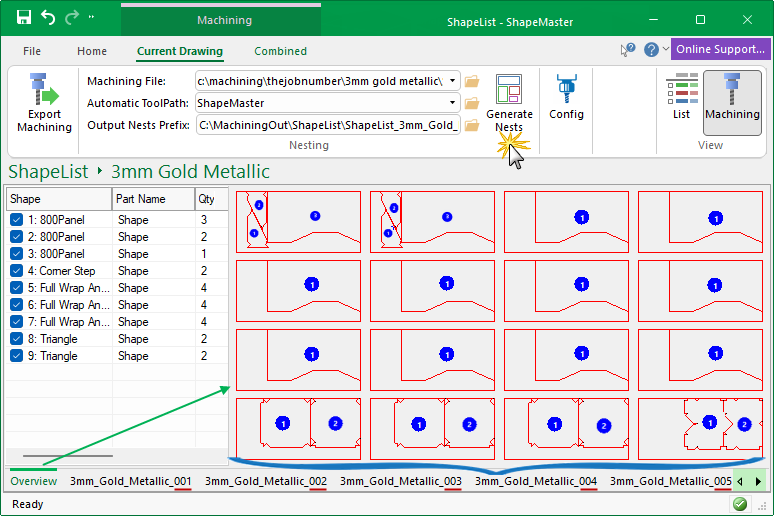
This nest generated 16 sheets of material - Click to view the last sheet i.e. _016
The Overview displays all nests, in this example 16 sheets of material.
Use the  arrows to scroll to view individual sheets - click on image above for an example.
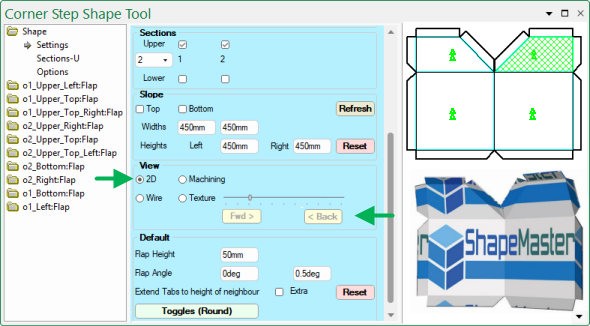
ShapeMaster lets you create you own libraries of reusable shapes/objects. This is done by using friendly dialogs with interactive formulas, allowing you to watch the shape change as you customise and take control over the mixture of tools used for a single part.
Shapes can be as simple as a folded rectangle for cladding or a complex as you care to make it. You can even put a formula behind the tool to use if required. For example, the V cuts needed for folding might change from a 90 degree cutter to a 120 degree cutter as the shape changes, based purely on the sizes you type in.
In this example, we have customised the shape using the a property inspector with check boxes and edit boxes. The preview pane updates as changes are made. Here, the View selected is 2D, shown top right. The small green arrows show the grain direction, if applicable.
If we change the View to Texture or Wire, the slider and buttons can be used to watch the shape fold.
Only the selected View is displayed in the Preview Pane at any one time - both views shown here for illustrative purposes only.
This video shows how to customise a Rectangle Standard shape to design your own unique shape. [17:45 mins]
Watch this video to learn how to create angled shapes in ShapeMaster Software and save to your library for later use. [3:06 mins]